It’s fair to say that it often seems as if there are hundreds, if not thousands, of different gym exercises out there, and that barely a week goes by without some self-proclaimed expert announcing they’ve devised a new one that is ABSOLUTELY 100% GUARANTEED to give you a six pack/superhuman strength/an extra six inches in height/immortality (delete as appropriate).
So that’s why in this article we’re going to ignore all those and just focus on what we’re calling the Classic Gym Moves! These are the exercises that people have been doing for decades and have (so far, at least) been proven to be safe and effective, including all the famous exercises you’ll have heard of such as bicep curls, squats and bench presses. All the legends of the gym floor, if you will! The moves covered are:
- Crunch
- Plank
- Side Bend
- Superman
- Bicep Curl
- Triceps Extension
- Lateral Raise and Front Raise
- Shoulder Press
- Squat
- Bench Press
- Bent Over Row
- Flye
- Pullover
Oh, and these are all bodyweight or free weight moves. If you’re new to the gym it can be a good idea to use resistance machines to begin with, as they limit and control your movement in a good way, making it quite hard to perform the exercise incorrectly (and there’s a workout plan that uses machines here).

Free weight moves, however, are where it starts to get a bit more complicated, and once you graduate to them you need to be more aware of correct form, so that’s why we’ve put this guide together.
Here, we’re going to focus on the moves that you can’t go too far wrong with, by which we mean the exercises that are fairly intuitive, not too complicated and pretty safe. We’re not going to look at moves that could cause injury if performed incorrectly, such as the deadlift or clean and jerk.
Oh, and a quick disclaimer: if you’re new to the gym then you should at least have an induction where a personal trainer takes you through the basics. Also make sure you always warm up. And whilst this article looks at form points for specific exercises, you may also want to read our piece about general considerations when performing gym exercises.
Crunch
Okay, let’s start with a classic, and an easy one. Nowadays it’s considered better practice to perform the crunch rather than the sit up; the main difference between the two is the range of motion, as in a crunch you lift your torso off the ground whilst in a sit up you lift your upper body to an almost upright position.
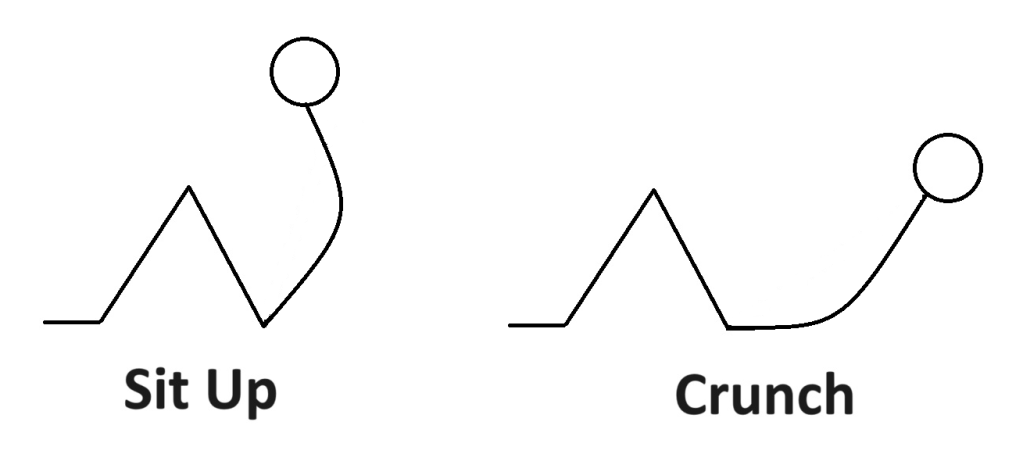
This is why, for safety reasons, the crunch is now preferred. Remember how you’re always told not to bend your back when lifting a heavy weight? Well, in a sit up you’re doing exactly that; your body is the heavy weight (sorry) that you’re trying to lift, yet you curl your spine as you do so.
How To Do It
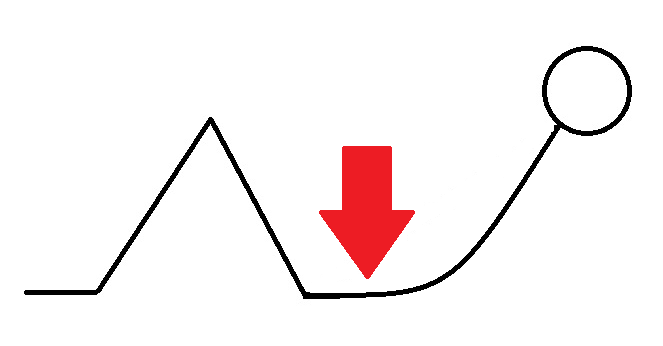
- Lie on your back with your knees bent and your feet planted on the ground, then raise your torso off the ground. You only have to lift until you feel it in your abs, then you can lower yourself again.
- Try not to bend your neck as you come up, and instead keep it in line with your torso. Staring at the ceiling may help with this.
- It’s safer to have your arms across your chest rather than behind your head; this not only means that the targeted area – the abs – is doing all the work but also that you’re not unnecessarily getting your neck involved by pulling on it and risking injury.
Safety Point
- When performing a crunch you shouldn’t maintain the curve in your lower back like you would in many other moves. The crunch is a fairly rare example of a move where you are curving the spine, and you’ll find it hard to do that without flattening your lower back onto the mat, so just go with it in order to ensure that your body’s weight is properly supported.
Finally, will doing endless crunches get you a six pack? Hmm, well, crunches do effectively target the six-pack muscle (the rectus abdominis, if you’re interested) but to get a defined mid-section you’ll need to hit the core and abs from multiple angles with a range of exercises and, er, get your body fat down to a dangerously low amount, so we’re going to say no!
Plank
The plank is an isometric exercise, which means that although it puts your muscles under tension you don’t actually move your body whilst performing it.
How To Do It
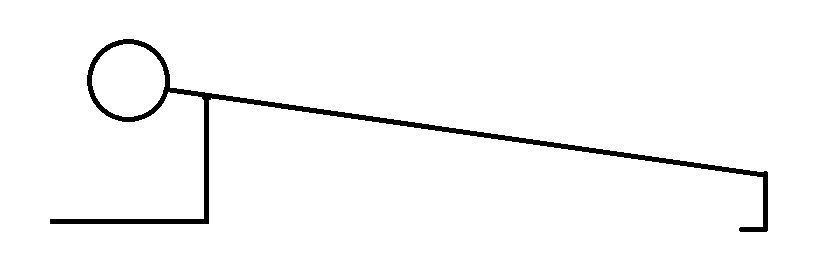
- Keeping your body straight, lie on a mat on your forearms and toes and hold that position for as long as you can. Your hips will want to sink to the floor, but it’s your job to make sure they don’t.
It probably doesn’t need a picture to illustrate it, but here’s one anyway:
The plank is good for working on muscular endurance as well as targeting your deep core muscles. What you’ll probably find to begin with, though, is that your supporting and stabilising muscles (such as those around your shoulders and shoulder blades) ache before your core is exhausted, so we’d recommend building up how long you spend doing this move over time in order to strengthen those, and begin by just holding it for ten or twenty seconds before having a rest then starting again.
A variation on the plank is the side plank, which works the deep core muscles on the side of the body.

This is performed by lying on one arm with the elbow bent to 90 degrees, so that the upper arm is vertical and the weight of the body is distributed along the forearm. The body should be kept in a straight line from the head to the feet, and the feet can either be one on top of the other, or one in front of the other if that helps you to balance better.
Side Bend
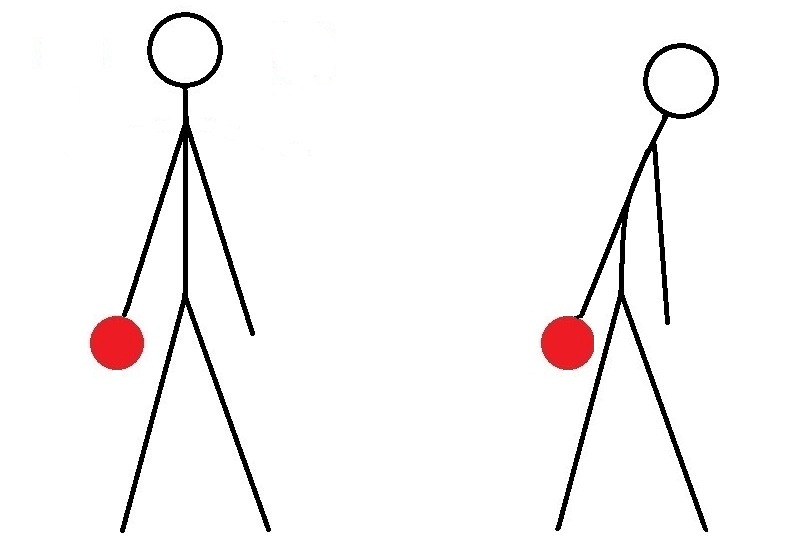
The side bend works the obliques, which are the muscles on the side of the core. When you perform this move, the obliques on one side are worked when you perform the bending motion and the obliques on the other side are put under tension as you return to the upright position. You finish the reps on one side before repeating the exercise with the weight in the other hand.
(And it’s worth noting that you should only have a dumbbell in one hand; you sometimes see people doing this with a weight in both hands, but if you do that then it becomes less efficient, as gravity is helping out and taking the pressure off the muscles you’re trying to work. In this exercise, the imbalance is part of the move.)
How To Do It
- Stand up straight with a dumbbell in one hand.
- Carefully and under control, lean to the side that isn’t holding the weight, so that the weight moves upwards. The weight should slide up one thigh as your other hand slides down the other thigh.
- Try not to lean forwards or backwards, ensuring you’re only bending to the side.
- Try not to lift the weight using the shoulder; whilst the shoulder will be used to hold the weight up, if you lift the shoulder during the move then you take the pressure off the muscles you’re targeting.
- Still moving slowly and under control, return to the upright position; this is the finishing position, so do not continue to bend to the other side.
- Then repeat the movement.
- Once the reps are complete, swap the weight to the other hand and perform the move on the other side.
Safety Points
- Do not bend beyond a point that feels comfortable; you shouldn’t overextend or try to move beyond your body’s natural range of motion.
- If you’re performing the move for the first time, don’t go mad with the reps; this movement isn’t done much in day-to-day life, so it’s safer to build up the reps slowly rather than trying to do as many as you can the first time.
A bodyweight move you can perform in order to work the same muscles as the side bend is the side dip.
In this exercise you start in the same position you would be in for a side plank, but then you lower your hips to the ground, slowly and carefully, before returning to the start postion.
Superman
Working the lower back muscles is very important; they form part of the core so should be worked alongside the abs, obliques and deep core, yet many people neglect them. This can not only lead to back pain and postural imbalances, but means that when people try to do a deadlift they find that they get further back pain because the lower back muscles haven’t been strengthened enough to properly assist with the move.
A good way to work the lower back muscles is to perform back extensions, using a machine such as this:
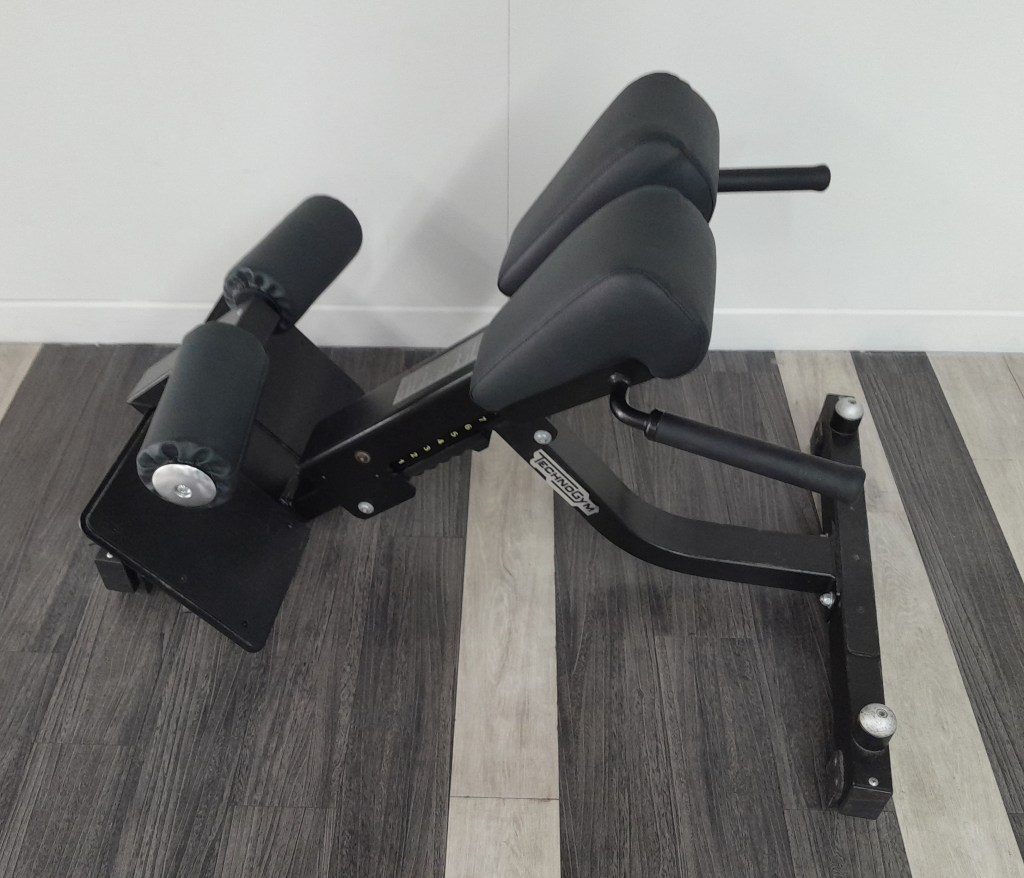
However, if you’re working out at home or just want to do a routine using a minimal amount of equipment then you can perform the Superman to work the same muscles.
How To Do It
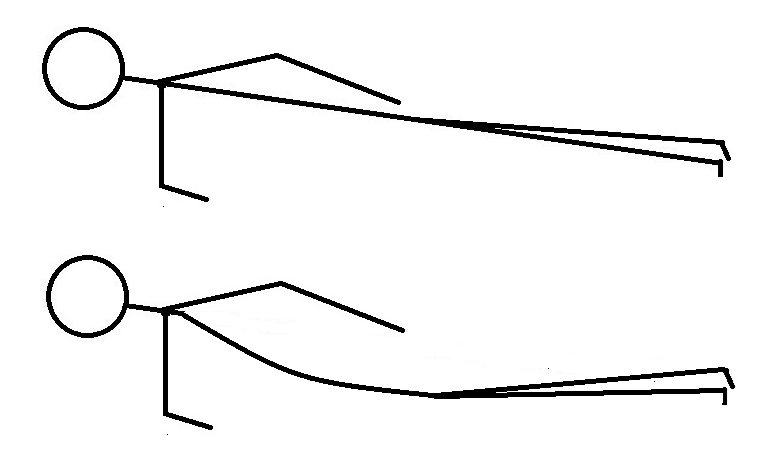
- Lie on your front with your arms and legs extended.
- Slowly raise your arms and legs so that your hands and feet are a few inches off the ground.
- Once you feel your lower back muscles engaged, slowly return to the starting position before performing the move again.

Safety Point
- Do not hyperextend; you should be lifting the torso and legs off the ground by a couple of inches and feeling the lower back muscles working, but shouldn’t be placing excess strain on them.
Bicep Curl
Okay, another classic. But if you think it’s not possible to do it wrong you’re, well, wrong! This is a move that should be easy and straightforward, but that doesn’t mean you don’t still need to pay attention to your form.
How To Do It
- With a dumbbell in each hand and the palms facing forwards, stand with your feet shoulder width apart.
- Maintain a neutral spine, which is to say employ good upright posture and do not hunch the shoulders or exaggerate the curve in the lower back.
- Slowly lift the weights at the same time, bringing them up to your chest whilst keeping the upper arms fixed to the side of the body; it’s the elbows and forearms that perform the movement, and if the upper arms have to move then the weights are too heavy.
- Perform the move slowly and under control; do not swing the weights or use momentum to lift them.
- Carry out the move using the full range of motion, ie lift the weights to your shoulders and lower them until your arms are extended, but maintain a slight curve in the elbow at the bottom of the lift in order to prevent the elbows from taking excess strain.
Safety Point
- A classic mistake is using weights that are too heavy, which can lead to you contorting your torso as your upper body tries to compensate by helping with the move. If you’re using a barbell you can end up bending forwards or backwards, and if you’re using dumbbells to perform alternating bicep curls (where you take it in turns to lift the left and right arms) you can find yourself bending to the sides, both of which can cause injury.
- In either case, reduce the weight and don’t increase it again until you can perform your intended number of reps with correct form.
A variation on the bicep curl is the hammer curl. The form points are exactly the same, with the only change being that you perform the move with your palms facing each other, so that the movement is similar to what you would do when hitting a nail with a hammer.
The hammer curl places more emphasis on the forearm muscles than in the standard bicep curl.
Triceps Extension
Triceps extensions work the opposing muscles to the biceps. So whereas the bicep muscles flex, or close, the elbow, the triceps are the muscles used to pull the forearm away from the upper arm.
How To Do It
- Stand upright with your feet shoulder width apart, with one dumbbell held in both hands. (Though you can also perform this move sitting down or on your knees.)
- Raise your arms so that they are straight and vertical, and the weight is above your head.
- Keeping the upper arms fixed by the side of your head, bend the elbows so that the weight moves behind your head, slowly and under control, then lift it up again so that your arms are straight once more.
Safety Points
- Don’t do this move if you have any shoulder mobility problems. If you do, try box dips instead.
- Don’t go too heavy too soon; practice the move with a lighter weight whilst you get used to the movement and find your range of motion.
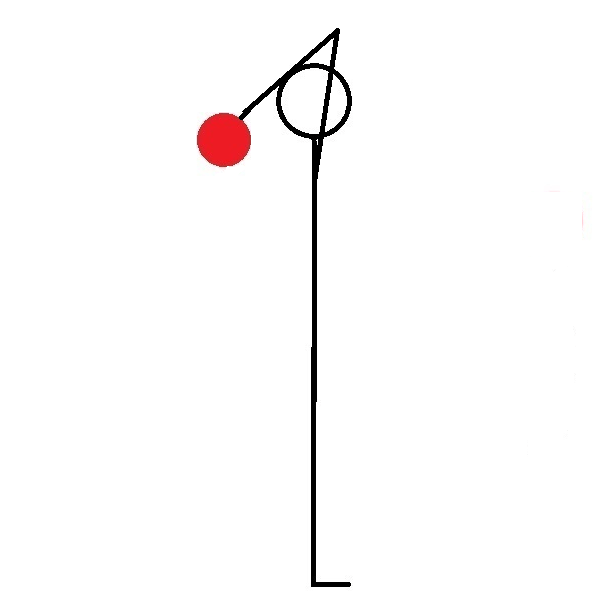
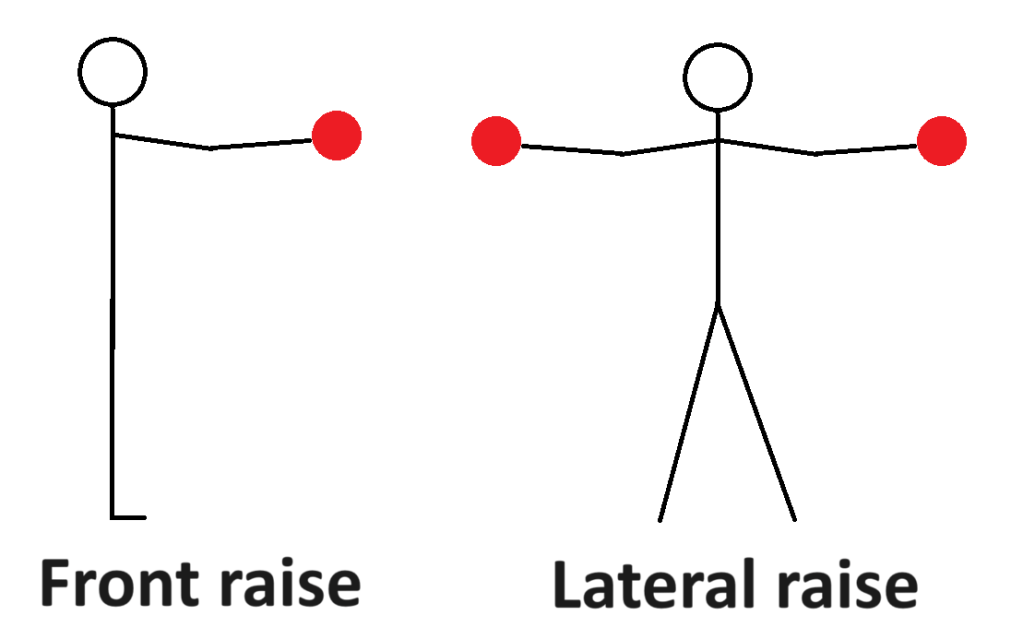
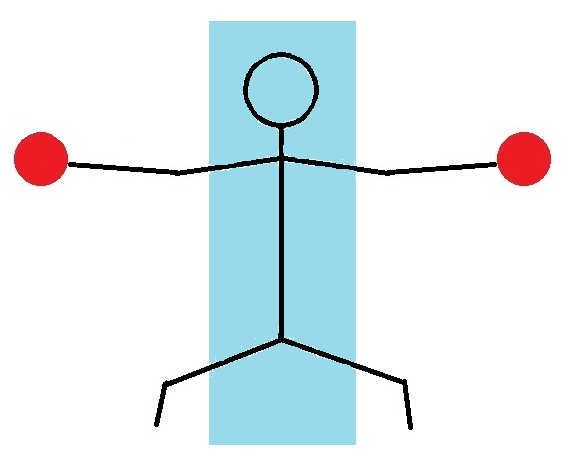
Lateral Raise and Front Raise
We’re going to cover these at the same time because they both work different parts of the same muscle (the deltoids) as well as being performed pretty much the same way: in both moves you hold a dumbbell in each hand, but in a front raise you raise them in front of you (as per the name, huh?) whereas in a lateral raise you raise them to the sides (and we’ll explain that name at the end).
It should be said that a beginner should perform these moves with a very light weight (we’d suggest 2kg dumbbells to start with) because even experienced gym goers will struggle to do them with heavy weights (there are biomechanical reasons why you can lift more weight in a bicep curl than in a lateral raise or front raise).
How To Do Them
- As in the biceps curl, you should be standing up with a dumbbell in each hand, by the side of the body. The feet should be shoulder width apart and the spine should be neutral.
- You then raise your arms out to your sides (for a lateral raise) or out to your front (for a front raise), lifting the weights under control without swinging them.
- There should be a slight bend in the elbows (to reduce strain on the joints) but the elbow angle shouldn’t change during the exercise, as you’re working the muscles in the shoulder and don’t want other ones helping out.
- The arms should not be raised any higher than parallel with the floor. The reason for this is that if you go any further you’re no longer effectively working the delts, as the traps have started to take over.
Safety Point
- We’d reiterate that you should use light weights for this. If you go too heavy then you’ll end up twisting and distorting your torso as other muscles try to help out.
Fun fact: the etymology of ‘lateral raise’ and ‘lat pull down’ is different. ‘Lateral’ in ‘lateral raise’ refers to the body movement, specifically that you’re performing a lateral movement by taking your arms away from the body’s centre line, whereas the ‘lat’ in ‘lat pull down’ refers to how you’re working the latissimus dorsi muscle on your back.
Shoulder Press
The shoulder press uses your triceps as well as your shoulders, making it a good value exercise and, as with all these moves, we recommend performing it with lighter weights to begin with whilst you get the technique right.
How To Do It
- We suggest that you use dumbbells rather than a barbell when performing the shoulder press. This means you have to work on the joint stability of each arm more (as there’s an element of balance due to each weight being held in the air, plus you can’t rely on one arm to do more work than the other) but also resolves the problem of your chin getting in the way if you’re trying to lift a barbell from your chest above your head.
- Your feet should be shoulder width apart and your knees should be slightly bent. However, if it’s easier then you can perform the move sitting down, with your back supported.
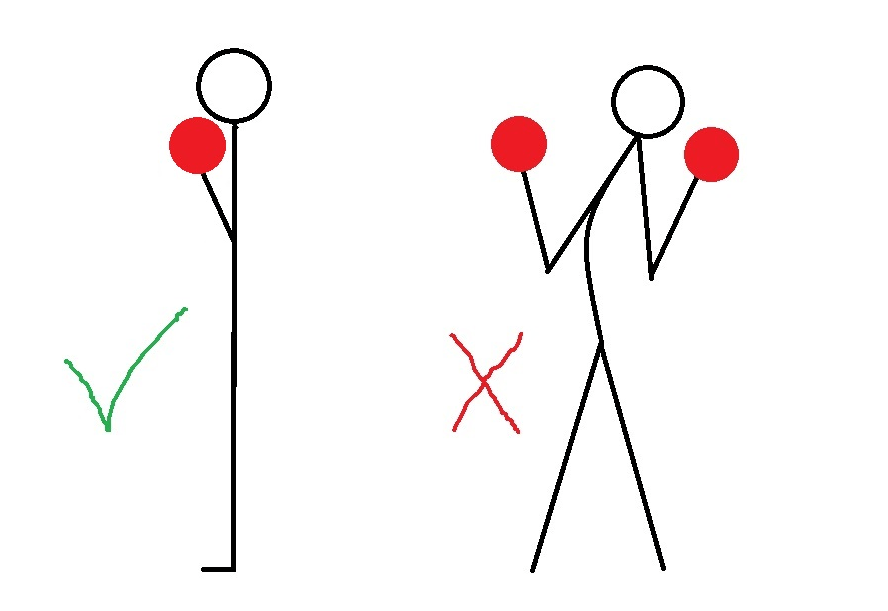
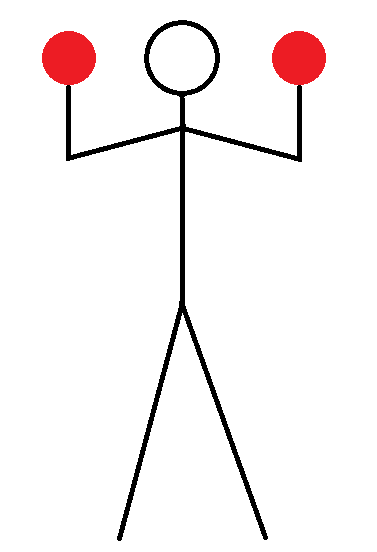
- Start by standing up straight with a dumbbell in each hand, then lift them up so your arms are in a ‘W’ shape, with each weight being held on either side of your head.
- In the starting position your upper arms should be lower than parallel with the floor, which is to say that your elbows should be slightly lower than your shoulders. Your forearms should be vertical.
- Raise the weights slowly and under control, ensuring they do not veer forwards or backwards, until your arms are almost straight and your upper arms are by the sides of your head.
Safety Points
- Do not overextend the elbows at the top.
- As before, don’t use weights that are too heavy. If you struggle to get the weights above your head, or your torso starts to wobble in order to support them, reduce the weights and try again. Or perform the move seated on an upright bench so that your back is fully supported.
Squat
The squat is what’s known as a compound exercise, because it works multiple joints and muscles. The squat is easier to perform, as well as being safer, than the deadlift, which is why we’re going to look at the former, but not the latter, here. (Still, if you are interested in the differences between the two then hopefully this article will explain them.)
Also, whilst a classic squat, or back squat, involves holding a barbell on your shoulders, we find it’s easier and safer for beginners to use a dumbbell or kettlebell, and hold it in front of their chest using both hands. This means the version of the squat being performed here is actually the goblet squat.
How To Do It
- Standing up straight, ensure your feet are shoulder width apart and that the knees will bend in the same direction that your feet are pointing.
- Holding the weight close to your chest, bend your hips and knees whilst keeping your torso more or less upright before coming back to the starting position.
- In order to ensure the neck moves slightly, but not too much, fix your gaze on a point in the distance and keep it there for the duration of the move. (I always find that when doing this in front of a mirror, the point where the legs of my shorts meet works well, as it goes up and down slightly during the move.)
- How far you squat will depend on your own range of motion, but it’s generally performed until the thighs are parallel with the floor.
- Try to make sure the angle of your shins and torso is the same as you squat. You can check this by performing a few reps with your side to a mirror:
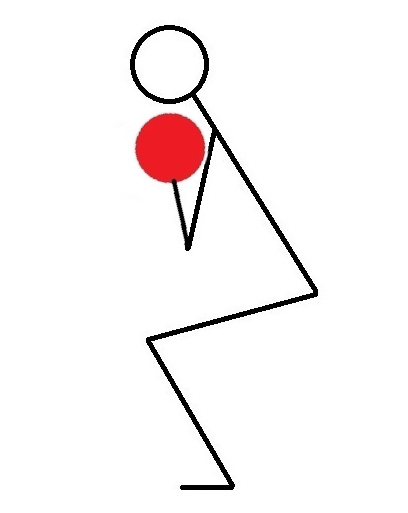
Safety Points
- Remember how you’re always told to keep your back straight when lifting something? Well, whilst the spine is technically never straight, you should still maintain the spine’s relative position for the duration of the move. This just means you should have an awareness of what it’s doing and that you should neither hunch your shoulders nor flatten your lower back. (You can read more about the spine and its preferred alignment here.)
- It’s an excellent idea to practice the move without a weight whilst you get used to the basic movements.
- If you do choose to perform a back squat, with a barbell behind your head, ensure the weight is on your shoulders and not your neck.
Going back to the deadlift, here’s how to do it: don’t! Not yet, anyway. The deadlift is a complicated move involving a number of muscles and a lot of form points you need to be aware of, so it’s not a good idea for beginners to do it. And when you do start to do it we strongly recommend having a PT demonstrate it to you and then check your form. Okay?
Bench Press
This is another compound move, and perhaps the most complicated one we’ll look at here. But, as we said at the beginning, in this article we’re generally looking at the classic versions of particular moves, so whilst you can do variations on bench presses including incline and decline bench presses, or by alternating which arm you use, this is about how to do the standard bench press performed on a flat bench.
How To Do It
- With a dumbbell in each hand, lie on a bench with your feet firmly planted on the floor. The thighs should ideally be parallel with the floor, but if your legs are too short then consider performing the move on a mat with your knees bent or putting something under the feet to elevate them.
- Ensure the head and neck are fully supported by the bench (rather than having the head hanging off the end of it).
- Hold the dumbbells on either side of your chest, with your upper arms at a 45 degree angle to the body.
- Retract the scapulae (which means pull back the shoulder blades) then push the weights upwards, slowly and under control, until your elbows are nearly fully extended but still have a slight bend in them.

Safety Points
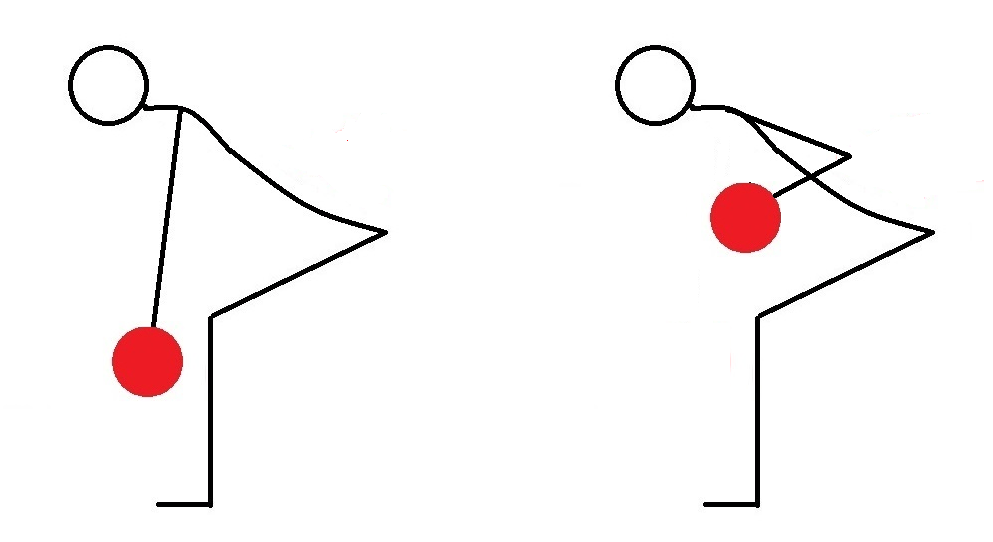
- Don’t flare out your elbows. Seen from above, your upper arms should usually be at a 45 degree angle to the torso; if they’re any further out then you may well start to feel it in your neck, meaning that the wrong muscles are taking the strain.
- Maintain the curve in the lumbar spine, which is anatomy talk for keeping the curve in your lower back rather than flattening it onto the bench. There’s no reason to do that, and if you do then that part of the body will be unnecessarily put under tension.
- Definitely don’t drop the weight on your head, chest or, indeed, any part of you, or, for that matter, any part of someone else, like their foot. We really can’t stress that enough. If you think it’s remotely likely that you’ll reach failure and drop the weights then drop them to the side, but at this stage you absolutely shouldn’t be lifting weights that heavy, and should just be getting used to the correct technique and to having your muscles being under tension.
Bent Over Row
The bent over row works the muscles of the upper back but also uses the biceps, as they’re the muscles that make the elbow bend. The muscles used are the opposing muscles to those worked during a bench press, as you’re performing a similar movement but are now pulling rather than pushing.
How To Do It
- Standing up straight with a dumbbell in each hand, slightly bend the knees before hinging at the hips until your torso is at around a 45-degree angle. Your arms should now be hanging vertically.
- Ensuring you do not flatten your lower back, pull back your shoulder blades before raising the weights to your chest, slowly and under control.
- Lower the weights to the starting position before starting again.
Safety Point
- As with many moves, protecting your lower back is important here. Ensure you maintain its natural curve and that it does not flatten as you bend forward. If you want to practice hinging at the hips whilst ensuring you don’t bend your back, this is our handy guide:
Flye
Like the bench press, the flye works the pectorals but, unlike the bench press, the triceps don’t get involved because the elbows stay fixed. This means the flye targets the pecs more than the bench press does, but also that you won’t be able to lift as much weight as in a bench press.
This move can be performed on a bench, but if you’re performing it for the first time we recommend lying on the floor to do it, for reasons we’ll cover at the end.
How To Do It
- Lie on a mat with your knees bent and your feet planted on the floor. Ensure your lower back retains its curve and isn’t flattened against the floor.
- Take a dumbbell in each hand and bring them above your chest with your arms straight. You’ll usually find it easier to have the wrists at a 45 degree angle, and should have a slight bend in the elbow for the duration of the move.
- Slowly and under control, and keeping the arms straight, lower the weights to the side of the body. You should be able to do this until your elbows touch the floor, but if you can’t then just lower them to the point where you feel the stretch on the chest.
- Bring the weights back up to the starting position, again keeping the arms straight, maintaining the slight bend in the elbows, and doing this slowly.
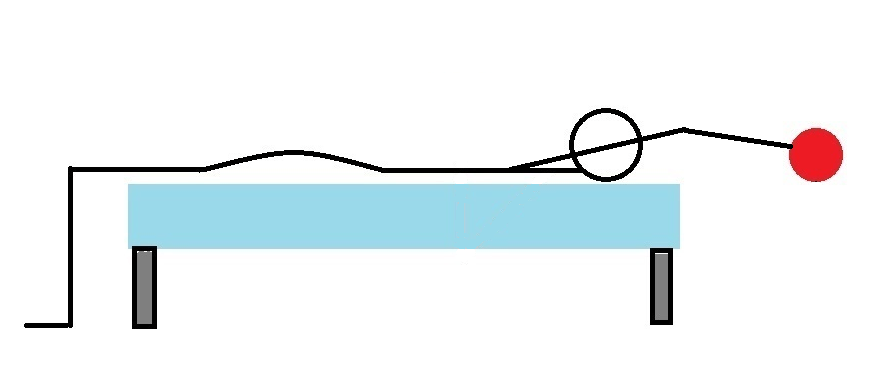
Viewed from above, it should look like this:
Safety Points
- Don’t go too heavy too soon. Because you don’t have the triceps to help you when you perform a flye, you won’t be able to lift the same weight as in a bench press
- If you do find yourself bending the elbows as your arms get towards the floor, try again using a lighter weight.
Anyway, the reason we recommend performing the flye on the floor to begin with is partly because it reduces the risk you’ll overextend your arms, simply because the floor will be there to stop you going too far, and also because the presence of the floor means you’ll be able to tell whether both elbows have reached the ground at the same time and therefore know whether one is moving quicker than the other or if they’re both moving at the same speed and to the same point.
Pullover
The pullover is similar to the flye, except that now the weight moves backwards and forwards rather than to the sides. It works the lats, the muscles in the back that are involved in moving the upper arms, but also works the deep core muscles, as they hold you in place whilst you perform the move.
How To Do It
- Lying on a bench or on the floor, with your feet flat on the ground, hold a dumbbell in both hands then lift it so it’s directly above your chest. Your arms should be straight but with just a slight bend in the elbows.
- Slowly and under control, lower the weight behind your head until your arms are more or less parallel with the floor. If you’re on the floor then the end point will be when the weight touches the ground.
- Raise the weight back to the starting position, again doing it slowly and under control. Stop when your arms are vertical.
- Ensure that you do not bend your elbows during the move; maintain the slight bend but do not increase it.
Safety Point
- If performing the move on a bench, ensure your head and neck are fully supported by it rather than hanging off the end.
So there we have the Classic Gym Moves! Hopefully this article has given you some good pointers to help you nail them, or at least get started, or perhaps fine-tune your technique. Don’t worry if you don’t remember them all first time; it’s a learning process, so it’s an excellent idea to keep going back and checking your form.
